|
How To Make Your Own Monitor Blur Buster From Junk Monitor Flyback Transformer.
What is a Monitor Blur Buster?
It is a device that many Monitor repairers used to modify it into the existing 14 and 15” CRT Monitor to solve the Monitor blur problem. Other name for the Monitor Blur Buster is Flyback Divider. The Monitor became blur or out of focus after few years in service and the reason why it slowly go out of focus was because the high resistance (up to 300 to 500 mega Ohm) in the focus divider changes value proportionally to heat thus causing the focus voltage (about 5 to 8 KVDC) to change too. When the focus voltage change, that means the voltage to the focus electrode in the gun assembly in the picture tube will be affected and the result is a Blurry picture.
I knew that many of you (Monitor repairer) already know how to modify or make your own Monitor Blur Buster from Flyback transformer but somehow I still got lots of email asking me to show them step by step how to make one as most of the requests were from beginners. In many countries the use of 14 and 15” CRT Monitor were considered obsolete and many of the users already switched to LCD Monitor but to other countries many still use the CRT Monitors. Due to this I have decided to write this article on how you can make your own Monitor Blur Buster from Junk Monitor Flyback Transformer-Let’s begin!
Make sure the Flyback transformer is the cause of blurry picture.
Switch On the Monitor and look at the display, if it turn blur after few minutes or hours then most likely the flyback divider have problem. In some cases a blurry picture comes with a bright background too that was caused by an increase in the screen (G2) voltage.
If you miss diagnose it then your time will be wasted as sometime a blur picture could be cause by a defective PC tube or even the bad CRT socket.
Using a high voltage probe is a sure way to determine if the flyback or the PC tube have problem. Place the tip of the high voltage probe on to the focus voltage and read the reading. If the readout is steady even after you have On the Monitor for hours then suspect a bad Picture Tube or bad CRT socket. If the focus voltage increases say from 5 KVDC to 7 KVDC within a period of time then it is confirm that the flyback transformer/flyback divider have problem.
Find a good Junk Flyback Transformer
Normally I will salvage Flyback transformer from junk Monitors lying in the store room and all these Monitors were bought over from customers that do not want them to be repaired due to Lightning strike, no spare parts, broken Picture tube and etc.
For your information I do buy cheap new flyback transformer from my repair friends that have contact with those Monitor distributors that wanted to sell off the old model flyback transformer. I will use this new Flyback transformer if I have used up all the junk one from the store room.
Note: Please do not use a Junk flyback transformer from Monitor that have history of always getting blur like the ACER brand, IBM G50 and etc otherwise you will have double work if the Monitor turns blur again after the modification.
Solder out and cut all the necessary pins
Once you have identified the good flyback transformer, you need to solder it out and cut off all the necessary pins as shown from the photo and leave only the two pins.
Next cover the pins with epoxy (preferably the mixed liquid type) that you can easily get from any ware shop and make sure it is not the flammable type. All these spec can be obtain from the back of the epoxy cover. The reason to cover up the pins (safety purposes) is to prevent arcing from the pins to cold ground just in case if the flyback transformer develop problem after few years in service but generally this will not happen.
Once the epoxy had dried your next move is to solder two wires to the two pins of the flyback transformer and remember to cut off the anode cap too.
What to do with the original Flyback Transformer?
Solder out the focus and the screen (G2) voltage wire and tape it with a high quality black tape as a cheap black tape tends not to stick very well and very thin too. Leave the original flyback alone as it is needed to produce the high voltage for the picture tube.
Now remove the anode cap and joint the high tension cable of the original flyback with the junk flyback transformer into the double anode cap as seen from the photo. If you do not have the double anode cap, you can poke a small hole and joint it internally but after that make sure you seal it with silicon glue.
What’s next?
After you have soldered the two high tension cables into the double anode cap, now you solder the focus and the Screen (G2) wires of the junk flyback into the CRT board. You are not done yet-remember the two pins of the junk flyback? Solder the two wires to any of the Monitor cold ground.
Where should I place the junk flyback?
Find any good location in the Monitor such as at the side of the yoke coils but not on top of the switch mode power supply. Once you have located the good spot now you can use cable tie to secure the junk flyback so that it will not become loosen and create sound when it hit some other components that can scare off the customers.
Testing time
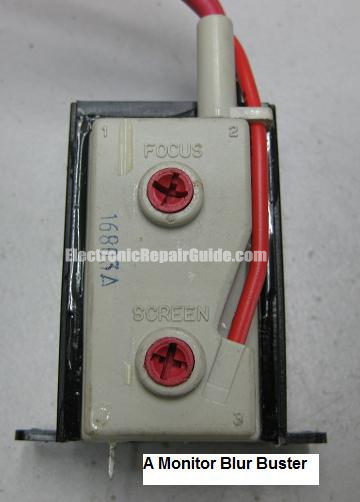
Recheck again all the wires, cable ties, solder joints and etc and after that you can turn On the Monitor. Normally the display is blur the first time you turn On the Monitor and now you can tune the Focus and the Screen (G2) knob of the junk flyback to get a sharp picture.
How safe is this modification?
I have modified thousands of Monitors and I can say that it is very safe. Do a proper job in the beginning to avoid any complaint in the future. If you have come across those old CGA or EGA Monitor back in the late 80’s and early 90’s you would have seen the flyback divider was located in the outside (as an external unit) and not integrated into the flyback. This is the same principles that I have use on the 14 and 15” VGA Monitor-defeat the original flyback divider and install an external flyback divider/Monitor Blur Buster. Even many old Television also use the external flyback divider. Remember that a flyback divider is not a Tripler. Hope that you have enjoyed this article and will send again the March repair newsletter next month. Take care and have a nice and fantastic day!
Click here to learn how you can become a Professional in Testing Electronic Components
Click here to learn how you can become a Professional in LCD Monitor Repair
Recommendation:
Recommended Mr Kent LCD TV Repair Membership website-Visit Now!
Recommended Mr Kent Plasma TV Repair Membership website-Visit Now!
|
|


Copyright@ 2006-2014-www.ElectronicRepairGuide.com All Rights Reserved