|
Common Mistakes of Electronics Repair Many of us have been interested in electronics repair from a very young age, but to some, the interest could have started in our 40’s or even 50’s! No matter what your age, electronics repair is fun and this hobby can be turned into profits if you know what to do with your knowledge. It is very exciting when you discover that electronics repair is the field that is really meant for you. Day and night you search the web for more information about electronics repair and hope to be able to understand and solve electronics problems. You are just simply excited and love electronics repair. However, for a beginner to become at professional level, one needs to avoid some mistakes that beginners always make. Below are the 7 most common mistakes a beginner should avoid. 1) Not using Isolation transformers
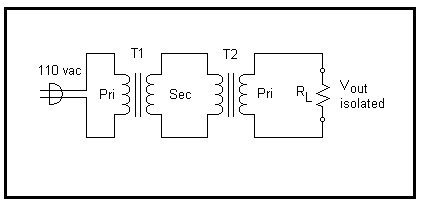
An isolation transformer is a linear transformer, often with symmetrical windings, which is used to decouple two circuits. An isolation transformer lets an AC signal or power be taken from one device and fed into another device without electrically connecting the two circuits. Isolation transformers block transmission of DC signals from one circuit to another, allowing AC signals to pass. Isolation transformers also block interference caused by ground loops.
240V:12V (T1) and 12V back to 240V(T2).
Without the isolation transformer, exposed live metal in a device under test is at a hazardous voltage level relative to grounded objects such as an oscilloscope ground lead. That means that if you connect the oscilloscope ground to the primary side of the switch mode power supply (SMPS), it will cause the building to trip! With the transformer, as there is no conductive connection between transformer secondary and earth (ground), there is no danger of touching a live part of the circuit while another part of the body is earthed (grounded). If you are new in this field, do yourself a favour and get an isolation transformer. Remember, the power transformer must be rated to handle the power of any equipment connected to it. 2) Turning on the equipment and taking measurements If you are very sure of what you are doing then you can proceed with this kind of test. If you are new and without guidance, you may feel uncomfortable or have no confidence to turn on the set and perform the voltage or signal test using either your multimeter or oscilloscope. You could blow up the power ic and other components while checking the supply voltage by shorting the VCC (DC supply pin) with the adjacent pin. I had personally heard a junior tech (many years ago when I was working) shout, “I want to quit this job”, simply because he had accidentally blown up a monitor power section. That incident really scared him due to the loud bang generated by his own carelessness while performing a voltage measurement when the power was on. Find someone that has this kind of experience to show you the right way of doing it, otherwise you may create more problems than you want. 3) Only using one multimeter
If you want to be a successful electronics troubleshooter, then don’t rely only on one single digital or analogue multimeter. The more meters that you have, the faster you can detect a fault. There is no way with just one multimeter you can accurately test all the electronic components found in a circuit board. It has already been proven that different components need different types of meters to check them. For electrolytic capacitors, you need an ESR meter to test it, for a LCD TV/Monitor backlight you need a backlight tester to test it, etc. If a component is bad and your multimeter says that it is good, then you will never find out the culprit. Don’t waste your precious time anymore and invest in quality meters to speed up your repair work.
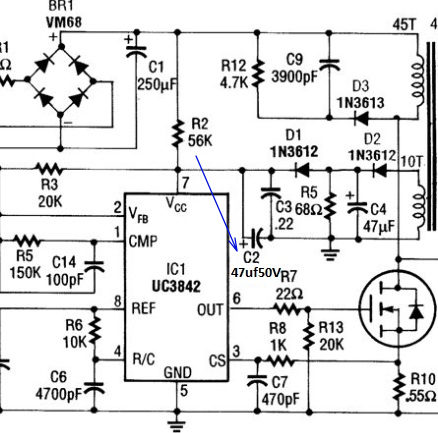
4) Not writing down your solution Whenever you have solved a problem, you need to write it down. Our brains just can’t remember every problem that we have solved. Simply by referring to our notes, with a snap of your fingers, you could solve a complicated problem within minutes or even seconds! Here is a tip for you on how to write down those important notes. If you have solved a “no power” symptom in a SMPS, don’t just write: “no power in model A1234 and the solution is to replace the power ic and an electrolytic capacitor”. This kind of note won’t really help you much when you refer back to it. You need to write something like: ” From the UC3842 power ic datasheet, pin 7 should have about 12 to 16 VDC but found only a few volts. Replacement of the ic did not cure the problem and the supply voltage to the ic was still low. So I began to check the components related to the supply voltage line and found one electrolytic capacitor (C2-47uf 50 VDC) had high ESR. Replacement of the two components cured the fault”.
Now don’t stop there. Continue with your notes by drawing a simple power ic schematic and show where the bad capacitor was connected as shown in the above photo. 5) Poor soldering If you are weak in your soldering skills, then I suggest that you put in some practice time before troubleshooting a real board for your customer. The reason for this is simple. To avoid a solder bridge that could cause more harm to the board. I have seen solder bridges a number of times when customers have told me that the set had been repaired by someone before. I guess the repairer could have been just starting out, because after removing the solder bridge and replacing a few components, the set came back to life again.
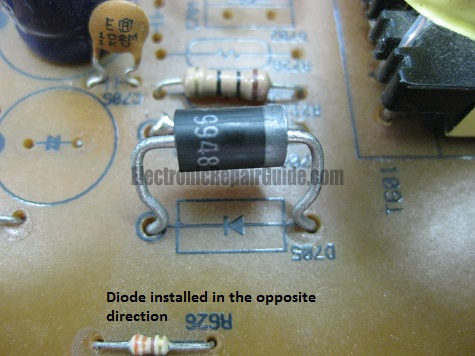
Simply practice on junk circuit boards and make yourself good at soldering so that you will not add more problems to the board you are troubleshooting. On YouTube.com, you can watch lots of videos on how to solder and also videos on how to remove SMD components. 6) Improperly installed components Many times I have seen circuit boards that have improperly installed components. The technician could actually have solved the problem, but because of their own negligence, the equipment was unable to be repaired. You will understand what I mean from the photos below:
You must be very careful when removing components, making sure they are put back in the correct location after they have been checked and found to be good. There is a possibility a manufacturer could have labelled a component wrong, however, this rarely happens. So, in order to prevent this kind of mistake, before soldering out any component, make sure you look at the markings on the board first. 7) Not asking questions Asking questions is not a sin thus you should not keep them to yourself. Beginners usually have a lot of things playing in their minds like “how to check this”, “how to test that”, “why did this component blow”,” what is the replacement part”, etc. You should try to find your answer first before asking the question as this causes you to have to think. If you still cannot find the answer, there are several resources in which to get your questions answered. You could post your question into an online forum, call up your electronics buddies or course mates, ask your lecturer or your mentor, etc. Many times, asking questions and getting answers will save you hours of frustration. Conclusion - In fact the above article is not only meant for beginners, it is meant for seasoned repairers also. Find out where your weaknesses are and learn how to improve them so that your journey to becoming a professional repairer can be cut short. The most important thing is your mind-set. A wrong or bad mind-set could cause you to be lazy, have no objective and negative thinking. Set your path right by having the right mind-set and you will see success very quickly.
Click here to learn how you can become a Professional in Switch Mode Power Supply Repair
Click here to learn how you can become a Professional in Testing Electronic Components
Click here to learn how you can become a Professional in LCD Monitor Repair
Click here to learn how you can find burnt resistor value
Click here to Get 24 Best Electronics Repair Articles
Click here to learn Basic Electronics By Greg S Carpenter
Recommended Mr Steve Cherubino Laptop Repair Videos For Beginners!
Recommended Mr Kent Projection Television Repair Membership website-Visit Now!
Recommended CRT TV Repair ebook by Humphrey Kimathi
Recommended Mr Kent LCD TV Repair Membership website-Visit Now!
Recommended Mr Kent Plasma TV Repair Membership website-Visit Now!
|
|


Copyright@ 2006-2014-www.ElectronicRepairGuide.com All Rights Reserved